Nano Banana Architectural Rendering: Prompts and Geometry Checks
A useful architectural image starts with a clear reference and constraints. Nano Banana can help explore materials, lighting and atmosphere, but a convincing image can still change the building geometry. Treat the output as a visualization draft and compare it against the source.
Walkthrough: a courtyard concept with warmer materials and light
Process demonstration, not a Nano Banana test. Both images were made with the OpenAI image generation tool in our editorial workflow. The fictional reference is AI-generated, not a CAD or SketchUp export. These illustrations explain prompt design and review, not a specific model’s guaranteed performance.
The target is warm mineral plaster, pale limestone paving, dark window frames and late-afternoon light. Lock the composition before specifying materials. Avoid combining a new camera angle, building extension and landscape redesign in one edit.
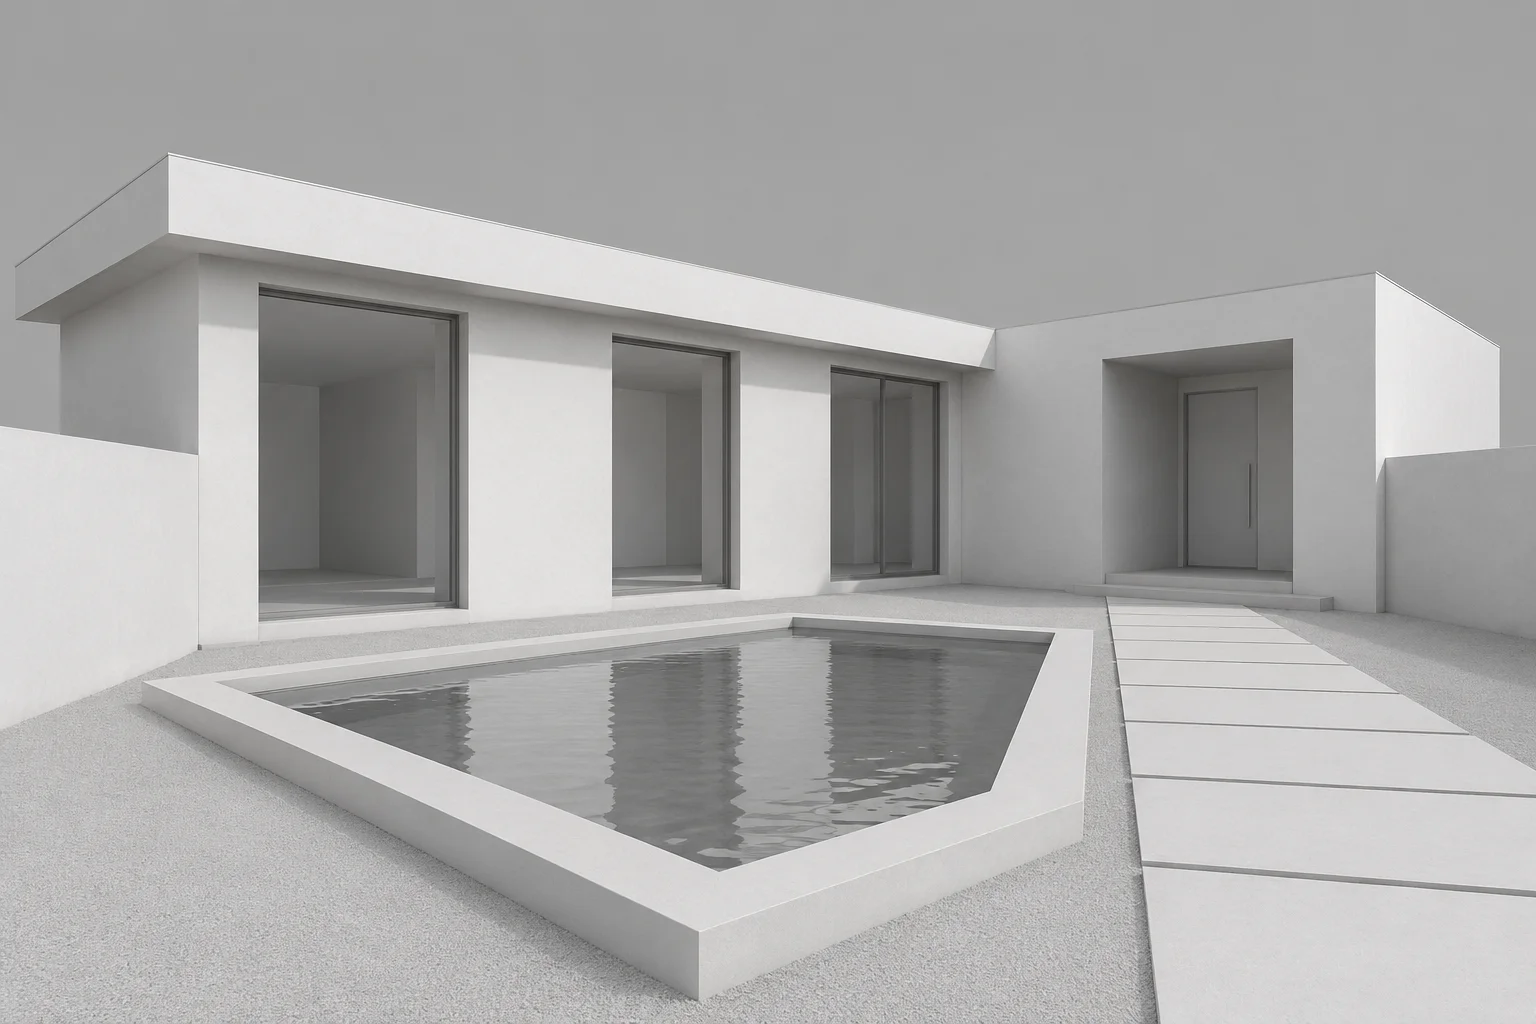
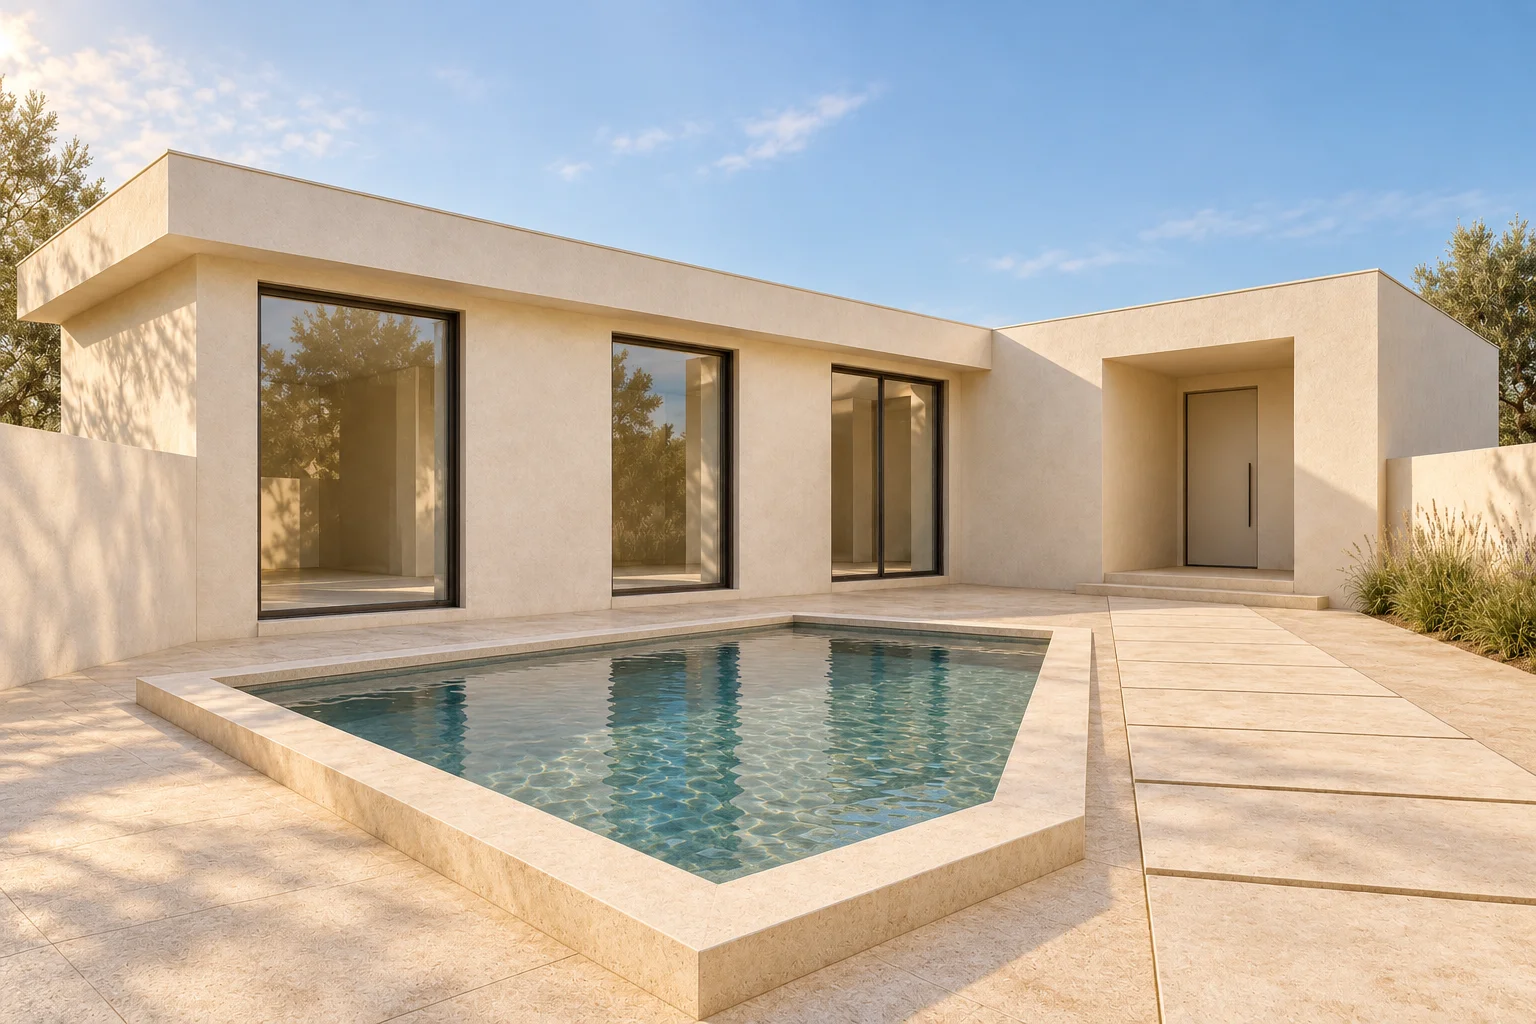
Download the demonstration reference
An adapted prompt to try with the reference
Upload the reference above and adapt this prompt to your image tool. This version tightens the constraints used to create our illustration; it has not been validated in Nano Banana.
Transform the attached courtyard reference into an architectural visualization.
Keep the camera angle, crop, roofline, three facade openings, recessed entry,
pool boundary, paved path and low walls unchanged.
Use warm ivory mineral plaster, pale limestone paving, charcoal window frames,
realistic glass reflections and muted blue-green water.
Set late-afternoon sunlight from the upper left with natural soft shadows.
Allow low grasses only beside the far-right wall; keep the entrance clear.
Do not add floors, openings, furniture, people, signs or background trees.
Prioritize reference geometry over decorative detail.
What to compare
| Check | Observation |
|---|---|
| Outline and openings | The broad composition is similar. Align the image edges with the reference before judging geometry or dimensions. |
| Materials and light | Warmer walls, textured paving and blue-green water express the requested mood; review shadows and reflections. |
| Added background | Trees appear behind the walls although absent from the reference. The edit did not fully follow the constraints; remove them when scene preservation matters. |
A focused next revision
Keep the current materials, lighting and all architecture unchanged. Remove only the added trees behind the boundary walls and their tree shadows. Retain the low grasses at right. Do not change the camera, openings, entry, pool outline or paving boundaries.That correction has not been run. The images show the reference and first visualization. Try the reference yourself and record your actual model, settings and output to compare added objects and geometry drift.
Prepare the reference
Export a clean screenshot with the intended camera angle. Remove selection outlines and interface panels. Mark the openings, roofline and boundaries that must remain fixed. Prepare a short material schedule instead of asking for a vague “luxury” style.
Copyable rendering prompt
Replace every bracket before use. This is a starting template, not a documented before-and-after test.
Transform the attached model screenshot into an architectural photography draft.
Preserve: [camera angle, roofline, building volumes, window positions, site boundaries].
Materials: [surface, finish, color and roughness for each area].
Lighting: [time of day, main light direction, weather].
Landscape: [planting zones], keep [entrances and paths] unobstructed.
Do not add floors, openings, structures or signage.
Prioritize the supplied geometry over decorative detail.
A repeatable editing workflow
- Generate a draft from the reference and save the original prompt, model name, date, aspect ratio and settings available in your service.
- Compare rooflines, openings, perspective and site boundaries side by side. Reject a draft with structural changes even if its lighting looks attractive.
- Edit one variable at a time: materials first, then lighting, then planting and people. Keep the reference attached when the interface supports it.
- Inspect the full-size image for repeated windows, implausible reflections, warped furniture and unreadable signage.
Troubleshooting
| Problem | Next edit |
|---|---|
| Windows or volumes move | List the fixed openings and roofline explicitly; simplify the scene and compare again |
| Materials look plastic | Specify surface roughness, scale and restrained reflections |
| Lighting feels flat | State one main light direction and time of day; remove conflicting lighting requests |
| Plants obscure the design | Define planting zones and keep entrances and paths clear |
| Each revision changes too much | Return to the reference and request one local change |
Can this replace a measured architectural render?
Use it for concept exploration and visual communication. Where dimensions, approvals or exact materials matter, verify against the source model and produce the required technical deliverables separately. No prompt guarantees exact geometry.
Record a useful comparison
Keep the input image, complete prompt, actual model, output settings, unedited result and rejected attempts. A cover illustration alone does not establish a tested result.
Continue learning
Model names and available options: Google image generation documentation. Checked on 21 October 2026; use the provider’s current interface for account-specific availability.